
In the previous post we learned about Docker’s basic concepts, how to use it, and how to run an app with multiple containers connected using Docker Compose.
Part I → Docker: definitions, example and Docker Compose
Part II → Docker part 2: Swarm and Docker Stack
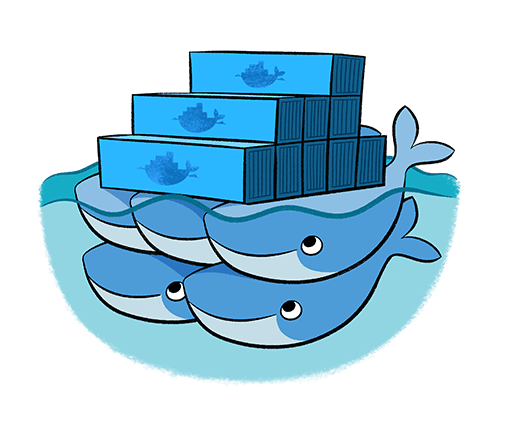
Source: https://hub.docker.com/_/swarm
But I left some concepts and problems without a proper definition or solution, like how to scale an app to support a larger user pool. One possible way to do this would be to migrate to a new server with better specs, but this means we’ll have to take the app offline while we make the change. A better solution arrived with the announcement of Docker Swarm.
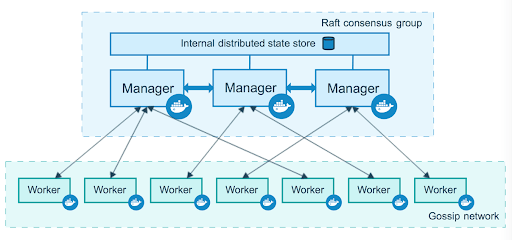
Source: https://docs.docker.com/engine/swarm/how-swarm-mode-works/nodes/
Docker Swarm allows you to create a network with many nodes connected between them, making it possible to run services on this network as if you were running them all in the same machine, keeping the necessary connections up in the background. There are 2 types of nodes (as seen on Figure 2): workers that only run the services assigned to them, and managers that additionally have control over the swarm settings.
This solves the problem from an infrastructure perspective, but there are still too many configurations needed to connect the containers running on a swarm. To simplify this, Docker also developed a new tool alongside Swarm called Docker Stack.
Stacking related containers
Docker Stack could be defined as an evolution of Docker Compose, this time officially developed by the Docker team (this means that it’s included on the Docker system when you install it), and focusing on supporting containers on a Swarm (as pictured on Figure 3). Like Compose, when you deploy a stack the Docker system creates a special Network for services belonging to this stack, making it easier to connect containers, no matter on which specific machine the service is actually running (I mentioned something about networks on the previous post, and if you explored a little the Compose example you may have noticed the presence of a network there too). Docker manages these connections in the swarm, simplifying a lot the configuration needed on both the nodes and the containers themselves, and allowing a better and easier handling of the services scale.
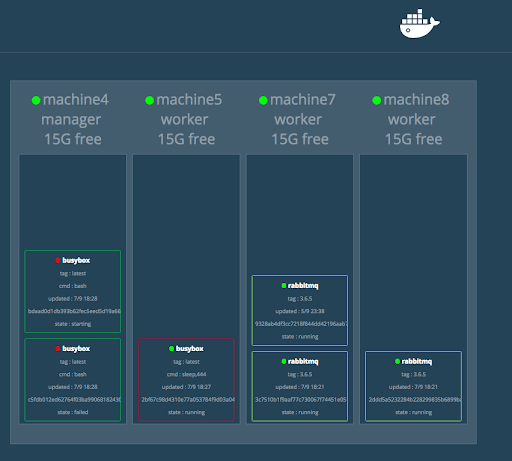
Source: https://github.com/dockersamples/docker-swarm-visualizer/
The self regulation capacity of tasks allows us to perform node maintenance without needing to take our app down, since we can take a node off the swarm network and the service level will repair itself on the remaining nodes, and once the maintenance is done we just have to join the node to the swarm again. Unfortunately at the moment of writing this post there is no self balancing of tasks when a new node joins the swarm (it would be a very useful feature that I hope will be added soon), so you have to rebalance manually by scaling the services up and then rescaling them down to the previous level. New tasks will be added to the new node, and after scaling down, tasks will be stopped on the node with more load.
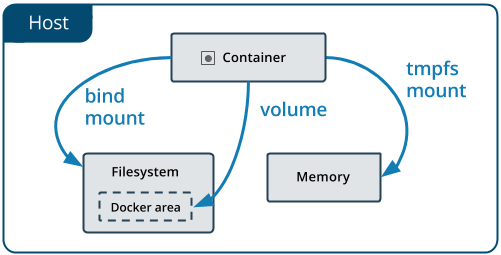
Before moving to the practical example, I want to explain a very important topic: storage in containers. Containers use a storage system based on layers, consisting of a read-only layer that contains all the information defined by the base image, and a read & write layer where all the data generated by the running container is stored. Since these layers only exist in the context of the container itself, if you delete the container all of its data will be removed as well. Another problem is that, since this data only exists inside the container, it is difficult to share files with other containers. To solve these problems there is another layer that exists outside the container (it is kept on the host system) while giving access to them, consisting of 2 options offered by Docker: mounts and volumes (depicted on Figure 4), the latter being one of the concepts I introduced in the previous post.
Source: https://docs.docker.com/storage/
There are 2 kinds of mounts: bind mounts and tmpfs mounts. Bind mounts link the read & write layer of the container with a folder on the host’s file system, while tmpfs mounts do the same but on the host’s memory. Both mount systems allow a container to share files with others (though only bind mounts allow it to store files permanently, since memory is wiped if the machine is turned off), but they also give access to any other process being executed on the host.
To avoid this critical problem, volumes keep a special directory managed by the Docker system that cannot be accessed by other processes. Since files kept in a volume are stored and managed in a folder in the host’s file system, they won’t be wiped even if the container is deleted, and can be accessed by any container configured to use the same volume (as shown on Figure 5). There are also several drivers that allow us to use volumes on cloud hosted storage services, like Amazon Web Services, Microsoft Azure, Google Cloud Storage, etc.

Source: https://docs.docker.com/storage/volumes/
Which storage system you’ll have to use will depend on what you need for your app. In our example, since we are using a SQL database, we need persistent storage that should only be accessed from the Postgres container, so it makes sense to use a volume.
Let’s Stack!
Now we’ll build our own stack, starting from the app we created for Docker Compose on the previous post. As you may remember, we had alongside our code the Dockerfiles, configuration files and the docker-compose.yml file. We’ll start by copying the content from the yml file to a new file we’ll call docker-stack.yml, and we’ll change it a little so we can run our stack like we did on Compose:
- We’ll remove the “myapp_” prefixes from all the service names (but not on the depends_on lines). We need to do this because when we create the stack, Docker assigns to each service, volume and network the name of the stack as a prefix (in this case, we’ll use “myapp” as the stack name).
- We’ll remove the build lines. This is not needed, since Docker will ignore these lines when running the stack. This happens because Docker doesn’t build images when working with stacks, it’ll only use previously built images on the local machine or stored on external repositories (like Docker Hub).
- We’ll remove the container_names lines. When running a stack, the containers created will be given names consisting of the service name, the task number, and a random string. Just like the build lines, if you leave these lines they’ll be ignored when running the stack.
- We’ll remove the environment lines. In this case, we’re doing this because we’ll improve how we handle environment variables using the environment files or env_files (another concept pending from the previous post).
- On the “db” service, we’ll remove the restart line. Docker Stack will handle rebooting tasks automatically (we can define some of it’s behavior using restart_policy settings).
- On the “app” service, we’ll remove the command line. Here we’ll introduce another way to handle the service behavior when booting up, named entrypoints, which are files that define all actions that the service will execute when starting (if you remember from the previous post, what we were doing on the command line wasn’t a good solution to the problem we had with the database).
- On the “app” service, we’ll add the following line to replace the command line we just removed: entrypoint: [“entrypoints/app_entrypoint.sh”]. This specifies a script that will run when starting the service (I’ll give more details about this later).
- On the “app” service, we’ll add the following line to replace the environment lines we just removed: env_file: app.env. This tells the containers executed for this service to use the environment variables defined on the specified file.
- On the “db” service, we’ll add a line similar to the previous one specifying the environment variables for the Postgres service: env_file: db.env.
Next, we’ll write these env_files with the environment variables needed to execute our services. On a new file named db.env we’ll add the password we removed from the yml file (remember to change this according to your own configuration):
POSTGRES_PASSWORD=password1Then we’ll do the same for our Rails service on a new app.env file (again, define this according to your own configuration):
RAILS_ENV=development
RACK_ENV=development
PG_HOST=myapp_db
PG_DB=myapp_development
PG_USERNAME=postgres
PG_PASSWORD=password1
You may be wondering why we are taking the environment variables to a separate file, or maybe you already suspect the reason. Environment variables may contain sensitive information, in our case it would be the password to our database. We can avoid sharing this sensitive information on the configuration files using a dockerignore file (similar to a gitignore file).
Now we’ll create a folder named “entrypoints” (though in our case we’ll only use 1 entrypoint file, it’s a good idea to have them on their own folder). Inside this folder, we’ll create the app_entrypoint.sh file, which will be a script that runs when we create the service (as we specified on the last step when editing the docker-stack.yml file). We add the following to the script:
#!/bin/bash
bundle exec rake db:create && bundle exec rake db:migrate
rm -f tmp/pids/server.pid && bundle exec rails s -p 3000 -b '0.0.0.0'
You may notice this is similar to what we did with the command line in the yml file, but this method offers some advantages. For example, the commands are better organized, easier to maintain, and it allows to write more complex scripts (for example, we can add a rake task to create and migrate the database only if it doesn’t already exist, and only migrate if it does), etc.
Since this new file won’t have permission to execute on the container, we need to edit our Rails app image. On the Dockerfile.rails file, we add the following line after the last COPY line:
RUN ["chmod", "+x", "entrypoints/app_entrypoint.sh"]This will allow the script to be executed on the container (otherwise, containers will fail when trying to create the tasks for the service). Since we are changing the app image, we’ll need to build it again:
docker image build -f Dockerfile.rails -t myapp_app .Finally, our docker-stack.yml file will look like this (notice the entrypoint line with the script we just created):
version: '3'

services:
  db:
    image: postgres
    volumes:
      - pg_vol:/var/lib/postgresql/data
    env_file: db.env
  app:
    entrypoint: ["entrypoints/app_entrypoint.sh"]
    image: myapp_app
    ports:
      - 3000:3000
    depends_on:
      - myapp_db
    env_file: app.env
  web:
    image: myapp_web
    depends_on:
      - myapp_app
    ports:
      - 80:80
volumes:
  pg_vol:
Now we can start deploying our stack, but since stacks can only run on a swarm we need to join one first. Since we are creating a new swarm we’ll execute the following command:
docker swarm initThis will create a new swarm with our machine as the manager node. From a manager node (like our machine right now) we can execute the following commands:
docker swarm join-token workerdocker swarm join-token managerThese will give us the commands needed to join the swarm as a worker and manager node respectively. Those commands will look like this:
docker swarm join --token <token> <ip>:<port>Where <token>, <ip> and <port> need to be replaced with the parameters given with the join-token command. Since manager nodes may also act as a worker node, you may continue using only your machine (in case you don’t have access to others). Once we have our swarm up we can deploy our stack with the following command:
docker stack deploy --compose-file docker-stack.yml myappHere, the –compose-file flag (or -c) allows us to select the configuration file where we define our services, and we are naming the stack as “myapp”. As I mentioned earlier, this stack name will be used as a prefix for the services, containers, volumes and networks names. You can check this with the following command:
docker stack services myappThis will show you the services defined on the stack, alongside some details like the replicas status, which in this case should show 1/1. Some may appear as 0/1, meaning that the service is not running, which might mean that the service is still starting or had a problem while booting up. We can see the tasks status with the following command:
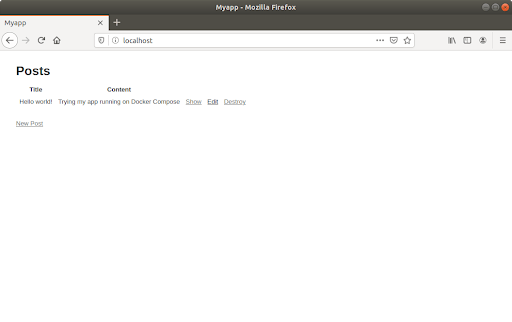
docker stack ps myappHere you’ll be able to see each task with their respective task number, their desired status and their current status. This allows us to notice if some service has some error, or if they are working correctly. If all tasks appear as “Running”, you may check our app in the browser. Notice that, since we are using the same volume we defined on the Docker Compose example in the previous post, that data will appear on the stack as well (assuming you didn’t delete the volume).
Let’s try scaling the Rails app service up to 3 replicas. One alternative to do so is using the following command:
docker service scale myapp_app=3We can see that the new tasks are created and start booting up. We can check this service’s status with the following command:
docker service ps myapp_appWe’ll see that now we have 3 tasks on this service, and their desired and current status. We can go to our browser and check that our app is working, where any of the 3 tasks might be processing our requests. Remember that, since they all come from the same image, they all have the same behaviour. If you’d like you may test scaling a service down to 0, the app will stop working according to the service that you shut down.
Another way to define the replication level of a service is specifying it on the configuration file. For example, if you want 5 replicas of the Rails app you may add the following to the “app” service configuration at the docker-stack.yml file:
    deploy:
      replicas: 5
We can update our stack configuration, even if the services are still running, using the same command we use to deploy:
docker stack deploy -c docker-stack.yml myappThen we can check our stack (or the specific service we updated) status and we’ll see the new replicas running.
Let’s suppose we had in our docker-stack.yml file that our Rails app used the image “myapp:v1”, and we want to update it to a new version, “myapp:v2”, that we already built. This can be done by simply changing the image defined on the yml file and updating the stack with the deploy command. The tasks will start upgrading following the definition of the restart_policy on the yml file (you can check how to set up these policies at https://docs.docker.com/compose/compose-file/compose-file-v3/#update_config).
To stop our stack, we use he following command:
docker stack rm myappThis will shut down the tasks and services. Remember that since we are using a volume on the Postgres container, even if we delete the “myapp_db” service our data will still be stored on the machine that used to run the container. To recover that data, we’ll have to start the Postgres service on the same machine, but this goes beyond this post objective (you can learn how to control what specific machine will run a specific service at https://docs.docker.com/engine/swarm/services/#control-service-placement).
To remove a node from the swarm, you’ll use the following command:
docker swarm leaveIf you are on the last node of the swarm, you’ll have to add the –force flag to the command. You can start a new swarm later to deploy your stack.
I hope these posts helped you to learn what Docker is, how to use it and some practical uses you can give it. Remember that my goal with these posts was to motivate you to learn more about Docker, since there is a lot more subjects that I left appart (other than the more technical details, there are a lot of useful subject like private image repositories, Docker Secrets to handle sensitive information, updating and maintaining services, replicating databases on several nodes, etc). If I caught your interest in learning more, now I encourage you to do so by taking online courses to understand the technical details of how containers work, and reading the documentation to learn more options when setting up your containers.
Useful resources: