
In the last few years, Docker has become very relevant in the app development and deployment world. If you still don’t know what Docker is and how to use it, I invite you to learn about this incredible and useful technology right now.
Part I → Docker: definitions, example and Docker Compose
Part II → Docker part 2: Swarm and Docker Stack

Source: https://www.docker.com/company/newsroom/media-resources
There are several courses and articles online where you can learn all you need to start using this tool with your applications, and in this post I’ll try to explain as good as I can what Docker is and how you can use it, without entering in too many technical details. If you want to learn more about how these details work, I’d recommend taking an online course or browse the official documentation, from which I’ll give a few links so you can dive deeper in some of the more relevant concepts.
Source: https://www.pxfuel.com/en/free-photo-oxemw
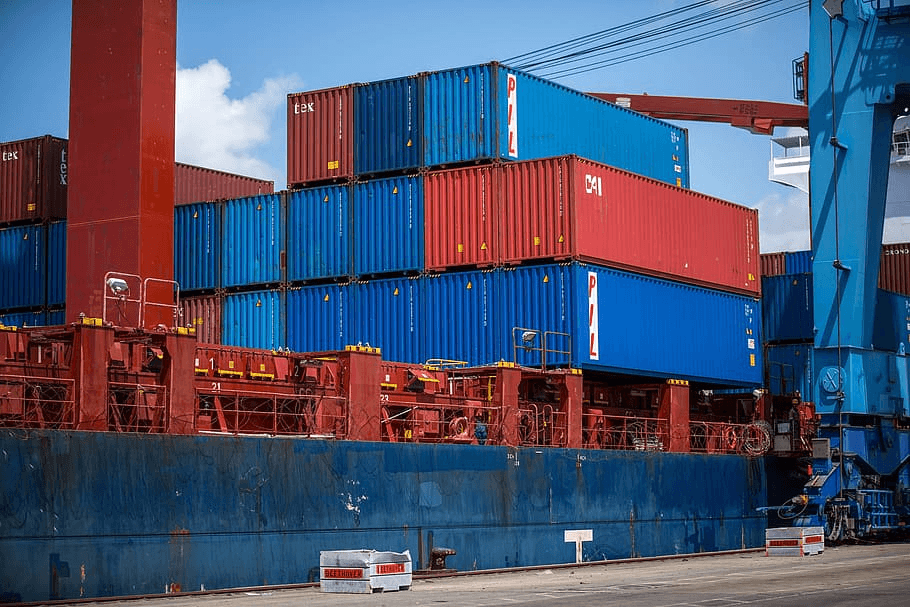
The first basic concept you have to learn is container, and maybe the easiest way to approach it is to think about containers used in freight transportation in ports and cargo ships all around the world (as the ones pictured in Figure 2). These containers store what is being transported, and both the port and the cargo ship don’t worry about what is stored or how it is structured inside, they just have a standard box that they can handle and transport. Software containers are similar, as they contain an application with all the necessary dependencies it needs to execute on an isolated environment (as depicted in Figure 3). This allows the app to execute with the same conditions always, since it is on its own environment, without worrying about the conditions of the machine it is running. You may have heard (or said yourself) the classic phrase “but it works on my machine”; well, containers make these kinds of problems disappear. Simply by having the Docker system installed the container will work, whether the machine is running a Linux or Windows system, or whether it’s a server in the basement, or is hosted in the cloud.
Source: https://medium.com/@ankitsamarthya/dockerize-existing-rails-5-api-with-docker-compose-yml-ce264fb87788
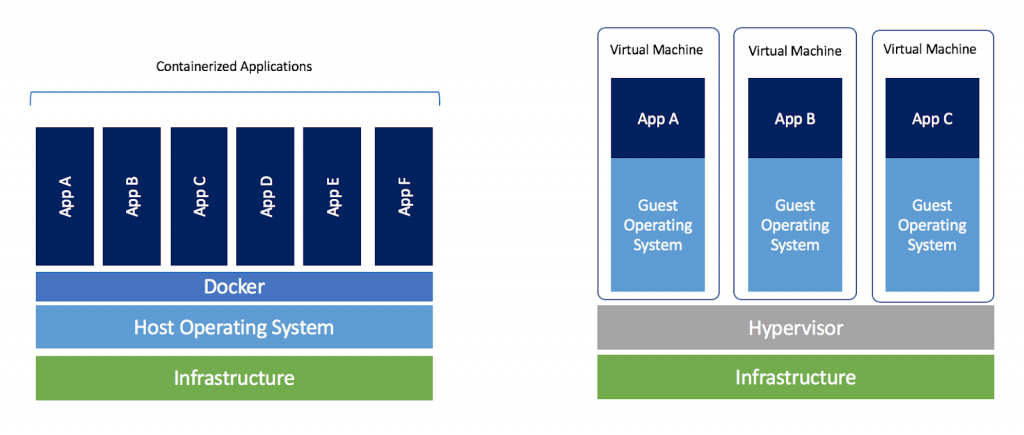
If you have worked with virtual machines you may be wondering what differences are there between them and containers, and the most important one is that containers run directly on the host operating system, without the need of installing a guest operating system (as illustrated on Figure 4) that in many cases result in heavy resources consumption. This makes containers very lightweight and portable, allowing them to run multiple instances more efficiently and with direct access to the machine resources (actually the Docker system acts as an intermediary, but it runs directly on the host OS). Personally I don’t actually know the technical details, but in summary what you need to know is that containers are more compact and portable than virtual machines, which makes scaling these applications a lot easier (I’ll give more details on this later).
Source: https://www.docker.com/blog/containers-replacing-virtual-machines/
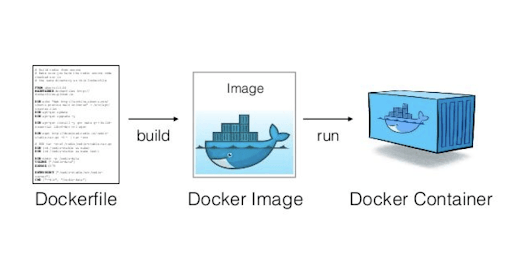
A container’s definition comes from an image, which consists of a read-only file that describes layers with different components that will be included on all containers executed from said file. These images act as a base model that can’t be executed, but from which one or more containers can be created and run, and all containers created from the same image are guaranteed to run exactly the same every time. If you know about Object Oriented Programming then this analogy (illustrated on Figure 5) may help to understand the relationship between images and containers: an image acts as a class, while the containers act as objects of these classes. This comparison isn’t totally accurate, for example objects defined by the same class may have differences between them, while all containers created from the same image will behave exactly the same way. But the relationship between the concepts is very similar, so this analogy may help you understand how an image and a container are related.

Source: https://javatutorial.net/java-oop
To make your application run on a container, you have to define an image first on a configuration file named Dockerfile (see Figure 6). On this file you can reference a base image on which you can deploy your application. For example, if you have a Ruby on Rails application you’ll have to use the Ruby image as a base. There are many images for common tools (like Ruby, Postgres, Nginx, or even operating systems like Ubuntu) that are developed and maintained officially on Docker repositories (you can explore some of them at https://hub.docker.com). Running containers from these official images allow you to use these tools like they were installed on your machine, without actually installing them. Once you learn to deploy these containers you may forget about the installation processes of those tools, and you can keep running them as if they were installed on your computer.
Source: https://medium.com/platformer-blog/practical-guide-on-writing-a-dockerfile-for-your-application-89376f88b3b5
Let’s create our own container!
First, we’ll need to install Docker on our system. To do so, follow the instructions given for your operating system at https://docs.docker.com/install/. For this example I’ll create a simple Ruby on Rails application with a Postgres database. The specific versions that I’ll be using are the following:
• Ruby 2.5.7
• Rails 5.2.4
• PostgreSQL 10.12
Next, we’ll create the base project.
rails new myapp --database=postgresql
cd myapp
Let’s change the Postgres configuration. In my case, I’ll add to the config/database.yml file a username and password I already created in my local environment (you can change this according to your configuration).
username: myapp
password: password1
Then, we create the database.
rake db:createWe already have the basic Rails app. Let’s add a scaffold so we actually use the database.
rails g scaffold Post title:string content:text
rake db:migrate
We define the Post’s index path as the home of our app adding the following in the config/routes.rb file.
root ‘posts#index’At this point we can already run our app and check that it’s working (as seen on Figure 7).
rails s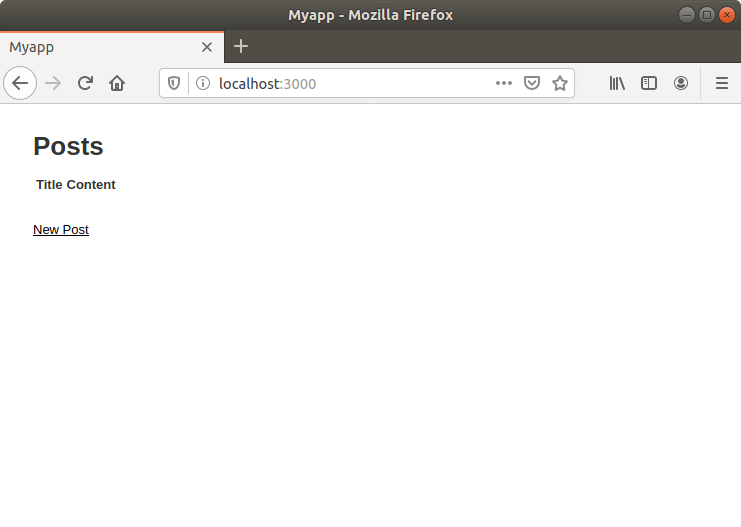
Now, let’s create a container with our simple app. First we have to define an image on a Dockerfile. We create on the app root folder a file called Dockerfile.rails (I’ll explain later why I’m using this file extension, but it can even be empty) and we add the following on it:
FROM ruby:2.5.7

RUN apt-get update -qq && apt-get install -y build-essential libpq-dev nodejs

RUN mkdir /myapp
WORKDIR /myapp

COPY Gemfile /myapp/Gemfile
COPY Gemfile.lock /myapp/Gemfile.lock

RUN gem install bundler -v 2.1.4 && bundle install

COPY . /myapp

EXPOSE 3000

CMD ["bundle", "exec", "rails", "server", "-b", "0.0.0.0"]
This file contains some instructions that will define how our image will be structured:
• FROM indicates that we’ll use the Ruby official image on it’s version 2.5.7 as the base for our image.
• RUN defines commands that we want to run on the base image, for example to install some dependencies.
• WORKDIR indicates a directory that we’ll use to run the next commands.
• COPY will copy the files indicated to the image.
• EXPOSE indicates that the containers executed from this image will make their port 3000 public. Each container will have their own IP address (they run on a virtual network on the Docker system, but don’t worry about this for now), and they use ports to give access to external processes like other containers (these ports are not the same as the machine ports).
• CMD indicates commands that will be executed on the containers created from this image.
Next we build the image with the following command:
docker build --file Dockerfile.rails --tag myapp .The –file (or -f ) flag indicates the Dockerfile used to build the image, in this case the Dockerfile.rails file we just created. The –tag (or -t ) flag adds a tag that will be used as a nickname for the image, in this case we are giving it the tag “myapp”. If you don’t specify a tag, you’ll only be able to refer to an image using the randomly generated ID (which makes it difficult to remember what the image actually is). You can also specify a version in this tag adding a colon and the version name at the end, for example “myapp:v1” will build the “myapp” image with the “v1” version. Docker always gives the last image you generate with a specific tag the latest version. The period at the end means that we are using the current directory as a starting point for the build.
Once the build is finished, we can list our images with the command:
docker image lsYou may notice that you have another image on your system, Ruby 2.5.7. Since we specified this image as a base in our Dockerfile, Docker downloaded it from the official repositories and kept it on your system.
Let’s run our image using the following command:
docker run -d --publish 3000:3000 --name myapp_cont myapp:latestThis will execute the container with the following configuration:
• The -d flag indicates that we want the container to execute in the background. We can change it for example to -it to make the container run attached to the current terminal, which can be useful in some cases (in our app case, it will show the Rails log).
• The –publish (or -p ) flag indicates that we are connecting the port 3000 in our machine with the port 3000 in the container, in that order (host:container). We have to use the port 3000 in the container since it’s the one that we defined in the EXPOSE line of the Dockerfile.
• The –name tag indicates the name that we’ll give to the container, in this case “myapp_cont”. If you don’t specify a name, Docker will give it a random name generated with 2 words, which can make it difficult to identify your containers. In this case, I used the image name followed by “_cont” to avoid mixing them.
• Finally we indicate the image and version that we are using to run the container.
You can run containers from official images using this command. For example, if you use the command docker run -it –name ruby_cont ruby:2.5.7 you’ll have a Ruby console running in the terminal, similar to using irb when you have Ruby installed in your system. You can quit the container typing “exit”, but this will only stop it. You can delete the container with the command docker container rm ruby_cont.
If you go to your browser and try to access the app, you’ll see that there is a problem with the database (as seen on Figure 8). This happens because the official Ruby image doesn’t include Postgres, and we didn’t install it either when we defined the image.

We could solve this problem adding the commands to install and setup Postgres in the Dockerfile, but since we are learning how to use Docker, we’ll use the official Postgres image to run a container with our database and connect it to our app. This might seem complicated or require a large configuration process, but there is a tool that simplifies it for us called Docker Compose.
Docker Compose: orchestrating multiple containers

Source: https://github.com/docker/compose
Docker Compose was the first tool that tried to solve the problem of managing multiple containers connected between them. It acts as an orchestra conductor that coordinates and keeps a certain definition of services specified in a configuration file. Before going on with our app, let’s check some important concepts.
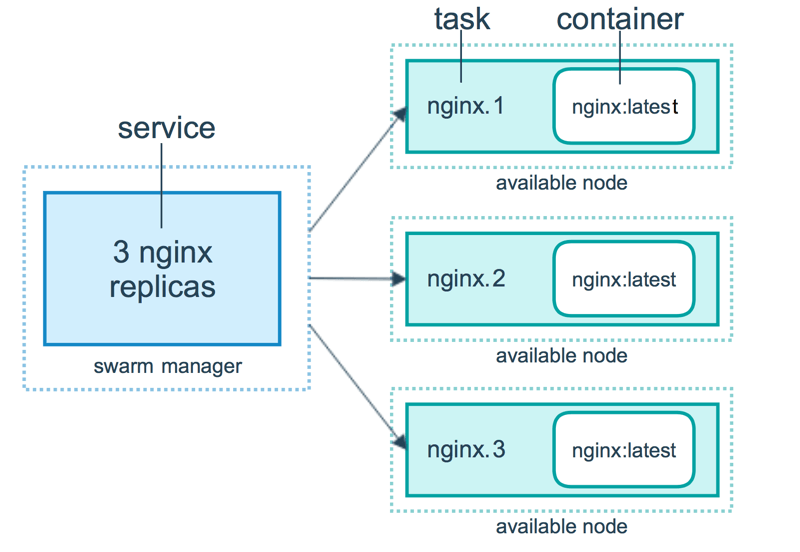
A service is basically a definition of an image with some configuration that will allow it to work in the context of a bigger app. For example, let’s consider an app with 3 services: a Rails application, a Postgres Database, and a Nginx server. The configuration will determine how the app will be set up, for example defining environment variables, which ports are open to access each service, where the data is going to be stored, the replication level I want to have, etc. Each service defines a certain number of tasks, which you may imagine simply as a running container (see Figure 10). The main purpose of these services is that each container that’s part of their tasks will come from the same image and configuration, making them act as if they were combined in one. They also seek to keep the service level defined, so if any container fails, the task will be stopped and restarted again, creating a new container with the same image and configuration, keeping the desired state of the service.
Another advantage of using services is that they allow you to perform updates in a very simple way and without needing to turn the app down. This is achieved by updating the image defined in the configuration file and executing the service update command. The tasks will start updating their containers (you can even configure the update process parameters, like the number of tasks that update at the same time, the delay between updates, what action to take in case of failure, etc) while keeping the service level.
Source: https://docs.docker.com/engine/swarm/how-swarm-mode-works/services
Let’s Compose!
Since Docker Compose was developed independently and doesn’t belong to the base Docker system, we have to install it following the instructions given at https://docs.docker.com/compose/install/. Once we are ready, we’ll continue working on our app. First, we’ll stop and delete our container since we won’t be using it anymore. This is done with the following commands:
docker container stop myapp_cont
docker container rm myapp_cont
Then we create the docker-compose.yml file and we write the following in it:
version: '3'

services:
  myapp_db:
    image: postgres
    container_name: myapp_db
    restart: always
    volumes:
      - pg_vol:/var/lib/postgresql/data
    environment:
      POSTGRES_PASSWORD: password1
  myapp_app:
    build:
      context: .
      dockerfile: ./Dockerfile.rails
    image: myapp_app
    container_name: myapp_app
    command: bash -c "rm -f tmp/pids/server.pid && bundle exec rails s -p 3000 -b '0.0.0.0'"
    ports:
      - 3000:3000
    depends_on:
      - myapp_db
    environment:
      RAILS_ENV: development
      RACK_ENV: development
      PG_HOST: myapp_db
      PG_DB: myapp_development
      PG_USERNAME: postgres
      PG_PASSWORD: password1
  myapp_web:
    build:
      context: .
      dockerfile: ./Dockerfile.nginx
    image: myapp_web
    container_name: myapp_web
    depends_on:
      - myapp_app
    ports:
      - 80:80
volumes:
  pg_vol:
You may have noticed in the configurations that there is a new concept: volumes. I’ll give more details about them on a later post, but for now I’ll say that they are a way to link the storage inside the container with the file system of the host. Since the data inside a container only exists with the container itself, if you delete the container all the data inside it is lost, so volumes allow you to keep the data outside the container.
Continuing with the configuration, we create the Dockerfile.nginx file (this is why we added “.rails” to the previous Dockerfile, to distinguish between them) in which we’ll define the Nginx server container.
FROM nginx

RUN apt-get update -qq && apt-get -y install apache2-utils

ENV RAILS_ROOT /myapp

WORKDIR $RAILS_ROOT

RUN mkdir log

COPY public public/

COPY nginx.conf /tmp/docker.nginx

RUN envsubst '$RAILS_ROOT' < /tmp/docker.nginx > /etc/nginx/conf.d/default.conf

EXPOSE 80

CMD [ "nginx", "-g", "daemon off;" ]
We create the nginx.conf file to define the Nginx server configuration:
upstream myapp_app {
  server myapp_app:3000;
}

server {
  listen 80;
  server_name localhost;

  root   $RAILS_ROOT/public;
  index  index.html;

  access_log $RAILS_ROOT/log/nginx.access.log;
  error_log $RAILS_ROOT/log/nginx.error.log;

  location ~ /\. {
    deny all;
  }

  location ~* ^.+\.(rb|log)$ {
    deny all;
  }

  location ~ ^/(assets|images|javascripts|stylesheets|swfs|system)/ {
    try_files $uri @myapp_app;

    access_log off;
    gzip_static on;

    expires max;
    add_header Cache-Control public;

    add_header Last-Modified "";
    add_header ETag "";
    break;
  }

  location / {
    try_files $uri @myapp_app;
  }

  location @myapp_app {
    proxy_set_header  X-Real-IP  $remote_addr;
    proxy_set_header  X-Forwarded-For $proxy_add_x_forwarded_for;
    proxy_set_header Host $http_host;
    proxy_redirect off;
    proxy_pass http://myapp_app;
  }
}
We change the config/database.yml file in our app to get the environment variables from the docker-compose.yml file.
  host: <%= ENV.fetch("PG_HOST") %>
  username: <%= ENV.fetch("PG_USERNAME") %>
  password: <%= ENV.fetch("PG_PASSWORD") %>
It’s almost done. First, let’s build the new images and run the containers with the following commands:
docker-compose build
docker-compose up -d
In this case, the -d flag indicates again that we want to run the containers in the background. If you try to access the app at this point, you’ll get another error because the database doesn’t exist. Let’s stop the containers with the following command:
docker-compose downNow we’ll change the content of the command line in the docker-compose.yml file to the following:
command: bash -c "rm -f tmp/pids/server.pid && bundle exec rake db:create && bundle exec rake db:migrate && bundle exec rails s -p 3000 -b '0.0.0.0'"Please note that this is not the best solution, it will only be used as a temporary fix. I’ll give a better alternative in the next post, using environment files or env_files.
Now if we run the containers again with docker-compose up -d (it’s not necessary to build the images again, since we haven’t changed the Dockerfiles) we can go check our app. By the way, since we are running Nginx to redirect to our app’s container we don’t need to specify the port!
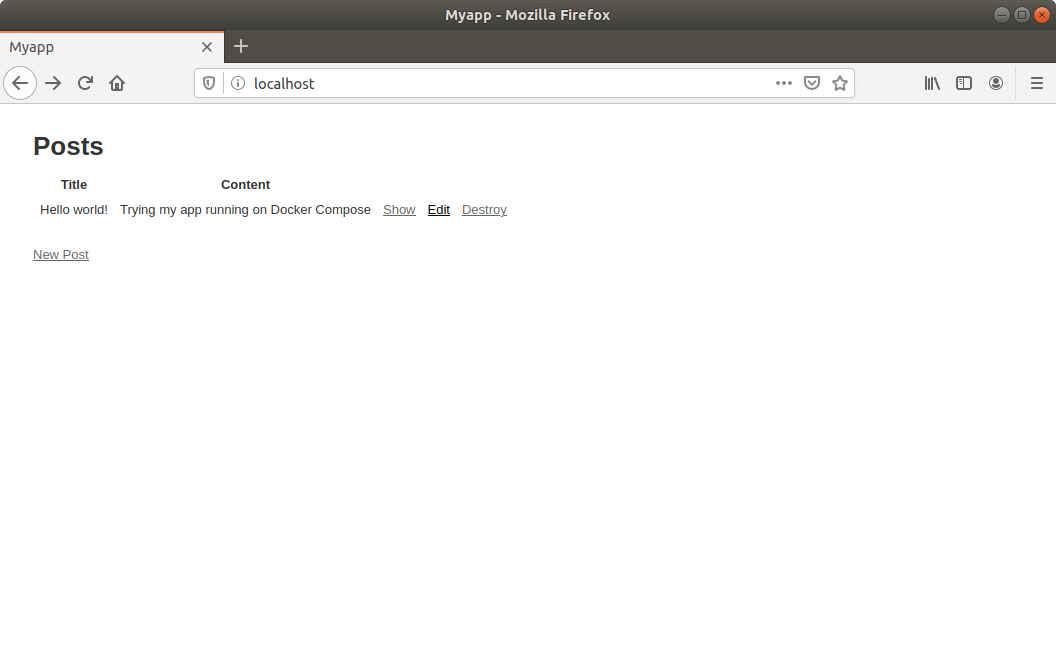
We finally have our app running on multiple containers! If you have been taking notes, you’ll notice that there are some pending concepts (scaling, volumes, env_files). For the moment, we know the basics to execute our apps using Docker Compose. The next step will be to execute containers on different machines. This can be achieved with a new tool, called Docker Swarm.
Useful resources:
• What are containers
• Docker Engine commands
• Best practices to write Dockerfiles
• Images commands
• Containers commands
• Services commands
• Docker Compose
• Compose files